Prefab contributions
All Prefabs in Noodl are just standard Noodl Components, and all of them are served to the Nood Editor Node Picker through the docs. This means that if you have built a Noodl app with components you think would benefit others as well - sharing your own Prefab with the rest of the Noodl community is just one GitHub Pull request away!
Quick overview of the process
- Build the Prefab following the guidelines below, and export the components.
- Download the Prefab Docs Boilerplate zip.
- Clone the Noodl docs repo and create a new branch.
- Drop all boilerplate files in the correct folders in Noodl docs, dont forget to add the Prefab zip export to the static assets folder.
- Add your Prefab to the index.
- Write your docs and setup the sidebar.
- Do a test build.
- Submit pull request
Prefab guidelines
For your Prefab to be as successful as possible we have a couple of guidelines that are good to follow. Please consider the following before exporting it:
The Prefab should work across many different projects, built by many different users. Try making it as general and isolated as possible, so that it can be used in a variety of scenarios. Some examples would include:
- Build in isolation: Use a fresh Noodl project to build the Prefab. This will make it easier to keep track of, version control and export cleanly with no unnecessary dependencies.
- General naming: Consider the component
Save Username To localStoragewith aUsernameinput vs.Save to localStoragewith the inputsKeyandValue. This will allow the user to not only save the username, but any value they need by providing their ownKey. If your Prefb needs to handle aUsernamekey specifiaclly, theSave to localStoragecomponent coul be used internally in another component in your Prefab with theUsernamekey already filled in. - Splitting up functionality: having separate components for
Init X Data,Get X Data,Set X DataandClear X Datainstead of one bigX Datacomponent with all functionality built in. - Use as litle styling as possible: All the All Style Variants, Color Styles and Text Styles used in your exported comonents will be imported along with the prefab. Try using as much of the default styles as possible to minimize the cleanup the user needs to do. Of course, this varies from Prefab to Prefab, but many Prefabs will be imported for their functionality and then restyled to fit the project. Whenever possible, keep the styles related to functionality and not visual flare. This guideline gets more relevant the more data-oriented your Prefab is.
- Prefix the component names:
Xano Prefab - Log In,Xano Prefab - Log Outetc. will make it easier to search for in the Node Picker, and prevent import conflicts if the project already includes a component calledLog In. - Use a separate sheet for the Prefab: To further prevent import conflicts it's good to build your Prefab in a separate sheet, instead of keeping it in the
Defaultone. - Consider using existing Noodl conventions: This would include calling signals things like
Do,SuccessandFailure, trying to model your components after the core nodes in Noodl, etc. This will make it easier for users to pick up how the components work if they are already familiar with Noodl. - Quality assurance: The Prefab you build will be shipped to end users everywhere. Make sure the quality and performance of your Prefab is as high as possible.
- Add comments in your components: This will make it easier for users to use the Prefab without having to reference the docs. This will also help them to understand how the Prefab is built should they need to make any modifications to the components in their project.
For a good example of how this can look in practice, clone and check out how the Xano Prefab is built.
Exporting the Prefab
When your Prefab is tested and ready to be published you will need to export it as a zip file. The best way to do this is to open the project of your Prefab and pressing Ctrl/Cmd + Shift + E. This will bring up the export popup:
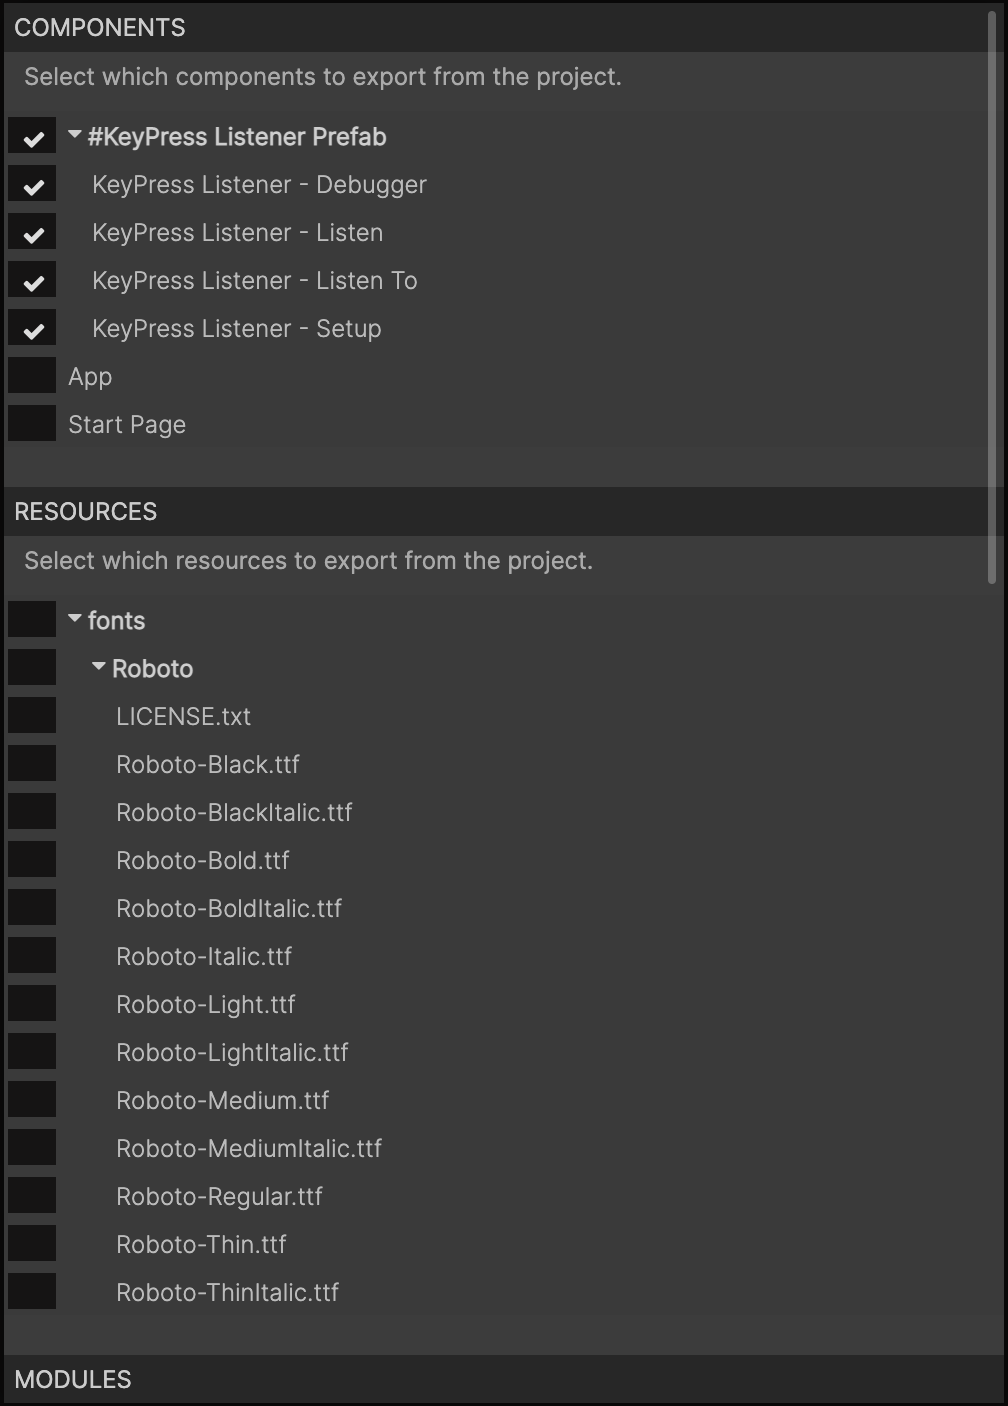
Select the components you want your Prefab to include, scroll to the bottom, and click Export. This will also automatically select all dependencies those components have, such as Style Variants, Color Styles and Text Styles, Fonts, Images and other components.
This will open up a file explorer window and you will be prompted to name the file. A good best practiche here is to name it with dashes and a version number, like so: list-with-icons-prefab-1-0.zip. This will make it browser safe, and will allow you to know what iteration of the prefab that has been exported.
Cloning the docs repo
To submit a pull request you first need to clone the docs repository from the Noodl Docs Github. If you are new to Git it can be helpful to use a visual Git client. A good alternative is Github Desktop, as it is both free and tightly coupled to the Gihub workflow. Here is a guide to get you started, pay extra attention to what they say about branches.
All pull requests for the Noodl Docs need to be done through feature branches - preferrably one branch per Prefab, as this will make it easier to keep track of.
Making changes
Once you have created a new branch, you're good to go to start making changes.
There are 4 files and folders you need to know about.
/library/prefabs/: Where a folder with your Prefab docs will live./static/library/prefabs/: Where any assets for your Prefab docs will live, like images or the exported zip-file./static/library/prefabs/index.json: Where you will link your Prefab for it to be available in the Node Picker.sidebarsLibrary.js: Where you will set up the sidebar menu for your Prefab docs.
We will expand on this later on in this guide.
Writing the docs
It's important for your prefab to have good docs, not only so that people can learn how to use the Prefab, but also for them to be able to find it outside of the Noodl editor.
To streamline this process as much as possible, you can download a zip-file with boilerplate docs here.
Boilerplate structure
In the boilerplate folder you will find a folder named docs-starter. In it you will find two folders.
markdown: Contains the files that should be placed in their own folder in/library/prefabs/assets: Contains the files that should be placed in their own folder in/static/library/prefabs/.
Noodl docs are written in Markdown. In addition to the Markdown standards there are a couple of CSS classes that are good to know. These are documented in the starter files.
Linking it up
The easiest way to write and preview your Prefab docs is to drop the folders in docs-starter in the correct folders and rename the folders to the name of your Prefab.
After that you need to make sure that you can navigate to them. This is where the file /static/library/prefabs/index.json comes in. In your downloaded boilerplate folder you will find a file named add-to-prefabs-index.json. In it you find a JSON object that you can copy and paste at the bottom of the array in the /static/library/prefabs/index.json file.
When this is done you can open up the terminal in the root of the docs repo and run npm i to install, and then npm run start. This will start up a local server with Docusaurus and open a new browser tab where you can preview your local version of the docs. Whenever you save any changes in the filebase, the preview will reload.
In the browser, navigate to the Library page and click the Prefabs section in the sidebar. Your Prefab should now be at the bottom of the list.
Prefab doc structure
When the boilerplate markdown folder has been renamed and dropped in the /library/prefabs/ folder, it should look something like this:
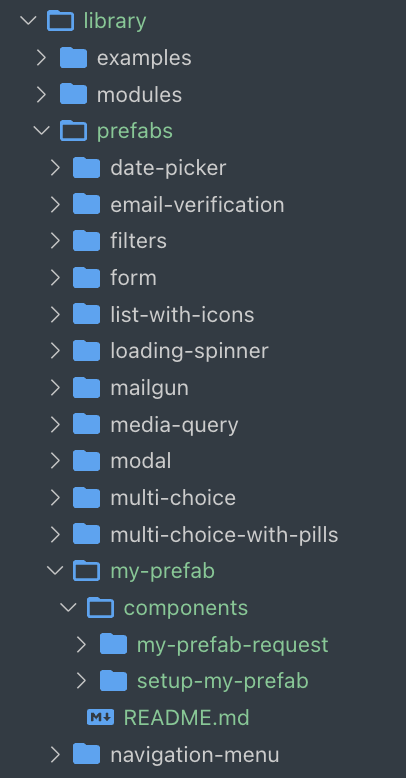
If you look at the structure you see a README.md in the root of the Prefab docs. This is meant to be a summary of the whole Prefab. You also see a folder named components. This includes specific docs for every component that is included in your Prefab. It's recommended that you keep your Prefab docs structured like this, as it makes them easier to reference.
For a good example of how a Prefab doc can be written, please check out the Xano Prefab is written and structured.
Creating a sidebar
If you browse to the Prefab now, you will see your docs, but you might notice that the sidebar is missing. This is because you need to edit one last file: sidebarsLibrary.js.
In your downloaded boilerplate folder you will find a file named add-to-sidebarsLibrary.js. This contains a JS array that represents the sidebar. Copy and paste it at the very bottom of the object in sidebarsLibrary.js.
It is recommended that you keep the base structure the way it is, with an overview, a category for components and a "Back to prefabs" link at the end. However, if your Prefab has many components it could be good to split them up into separate categories, groupling the components in whatever way is logical for your Prefab. Additionally, if your Prefab requires any external setup (with a third party provider, etc.) it can be a good idea to include a guide on it in the root of the Prefab docs, right after the Overview page.
Pull request time!
When all docs are written you need to check that everything builds smoothly. You can do this by running npm run build in the root folder of the docs in the terminal, when that is done you need to run npm run serve, open the local docs in a browser and check that your Prefab docs look like they should.
Then it's time to submit a pull request! Commit and push your changes to your Git branch, and then submit the pull request, either on Github or in your Git client (it if supports requests).
Your pull request will then be reviewed by the Noodl team, and published as soon as it has passed!